


LinenFinder LeadFlow - Outlook Calendar Synchronization
Overview
Synchronizing your Outlook Calendar with LinenFinder LeadFlow helps you keep track of tasks, appointments, and events across related applications.
This article outlines the steps required to complete the synchronization process.
Please note that this functionality is available for use in LeadFlow but not supported by TEXO. For troubleshooting guidance, see the Troubleshoot Sync Issues section at the bottom of this article.
Microsoft Azure Setup
To synchronize your Outlook Calendar with the LeadFlow Calendar, a Microsoft Azure account is required.
Creating an account is free for users who have never tried or paid for Azure. For more information, review the account options available on the Azure website.
Refer to Microsoft’s documentation for instructions on setting up a Microsoft Entra ID. This is an API to manage and register Microsoft applications.
Existing Microsoft Entra ID users can log in through the Microsoft Azure developer portal.
Once logged in, select “View” under the “Manage Microsoft Entra ID” section.
Tip: Click the images to enlarge the details.
Register Application
After logging in to Microsoft Entra ID, register an application.
Note: https:// is required in all URLs and Redirect URIs. http:// is not supported.
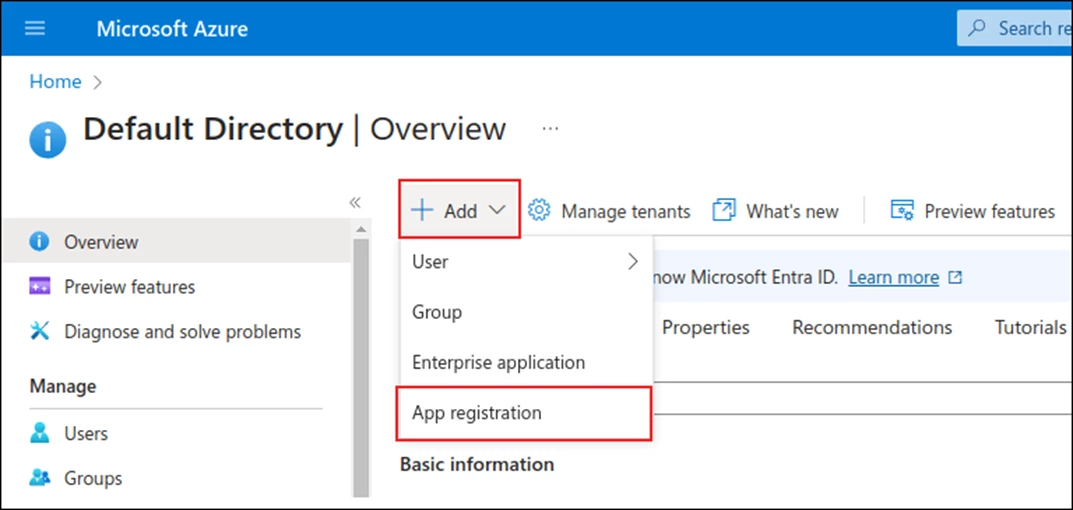
To create an application, click “+ Add” in the top menu, then select “App Registration.”
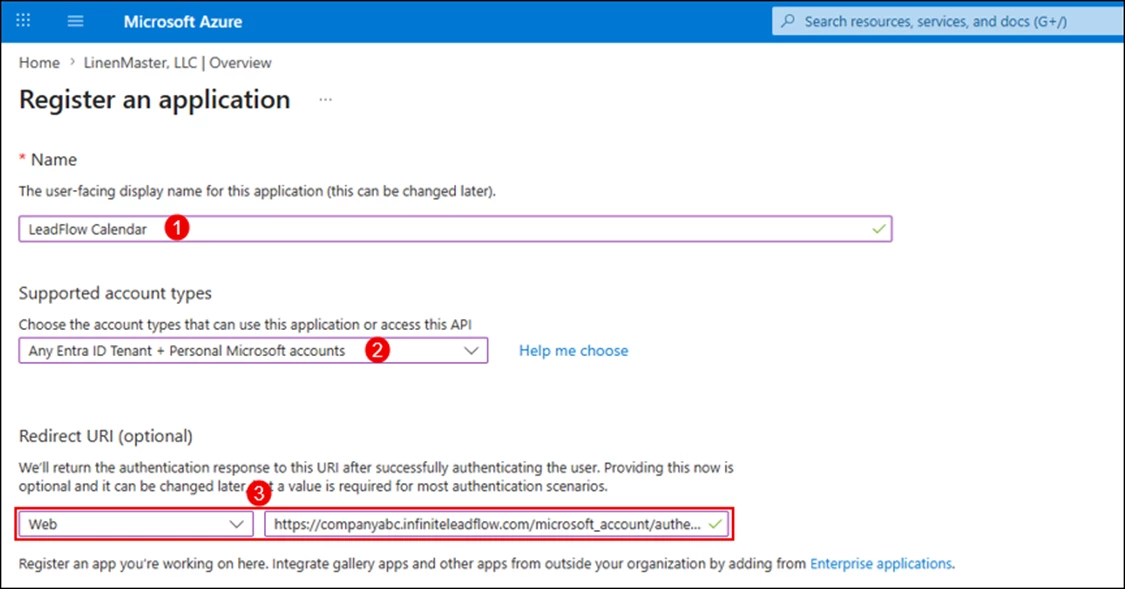
- Enter a unique Name for the connected application.
- In the Supported Account Types section, select the “Any Entra ID Tenant + Personal Microsoft accounts” option.
- In the Redirect URI section, select “Web” from the first dropdown menu. Then, enter the LinenFinder LeadFlow database URI (URL) followed by /microsoft_account/authentication.
- Example:
https://companyabc.infiniteleadflow.com/microsoft_account/authentication
- Example:
In the application registration page, click “Register” to complete the registration.
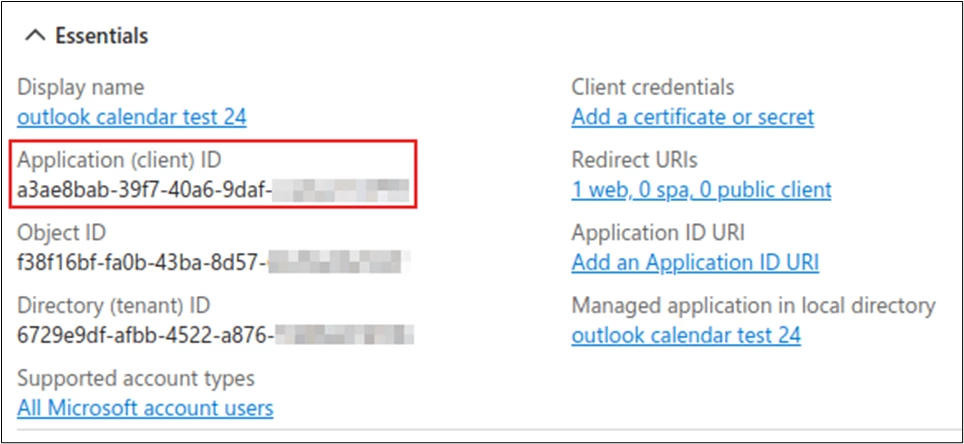
The Application (client) ID will then be available. Copy this value, as it is needed later in the Configuration in LinenFinder LeadFlow section.
Create Client Secret
The second credential required to complete Microsoft Outlook Calendar synchronization is a Client Secret. This allows LinenFinder LeadFlow to authenticate without user interaction.
*Certificates are optional.
To add a client secret:
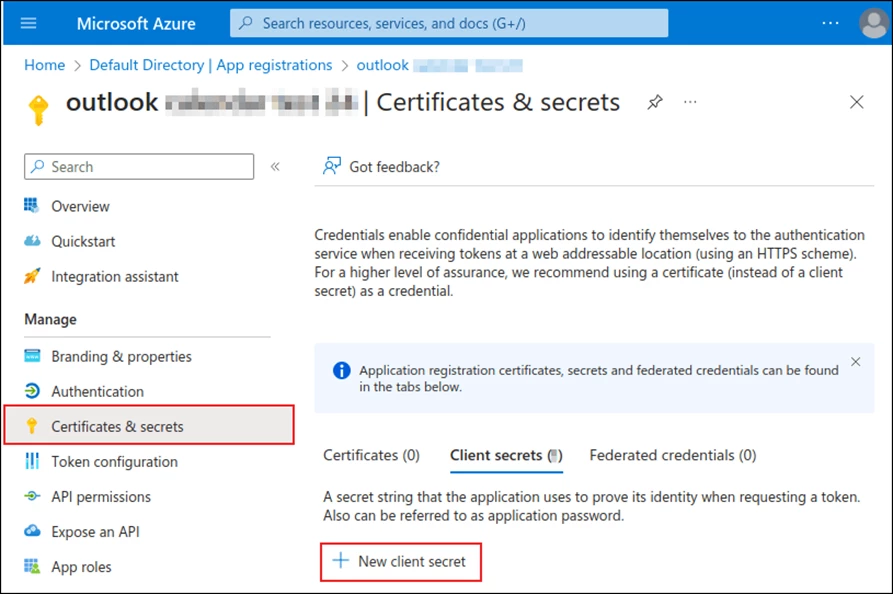
- Click “Certificates & secrets” in the left menu. Then click “+ New client secret.”
- Enter a description.
- Select an expiration period.
- Click “Add.”
Available expiration options include:
- 90 days (3 months)
- 365 days (12 months)
- 545 days (18 months)
- 730 days (24 months)
- Custom (this option allows the administrator to set a Start and End date)
Tip: Because resetting synchronization can be time-consuming, we recommend selecting the longest available expiration period to reduce the need for reconfiguration.
Copy the Value for use in the next section.
Warning: Client secret values can only be viewed immediately after creation. Be sure to save the secret before leaving the page.
Note: The Microsoft Azure configuration must be completed only once per LeadFlow database. After setup, each user can sync their own Outlook Calendar.
Configuration in LinenFinder LeadFlow
The following steps can only be completed by a user with Admin access in LeadFlow. Ensure our Support team has created this type of user before proceeding.
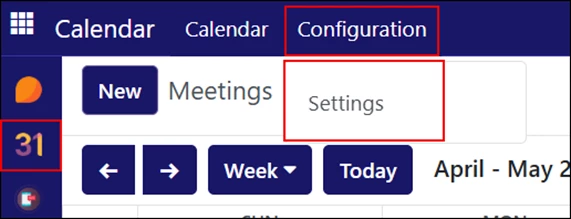
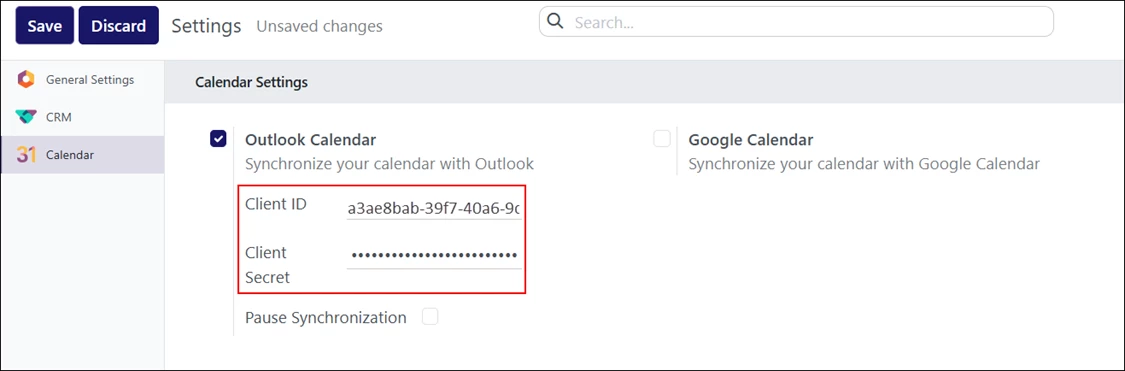
In the LinenFinder LeadFlow database, go to the Calendar screen → Open the Configuration dropdown and click “Settings.”
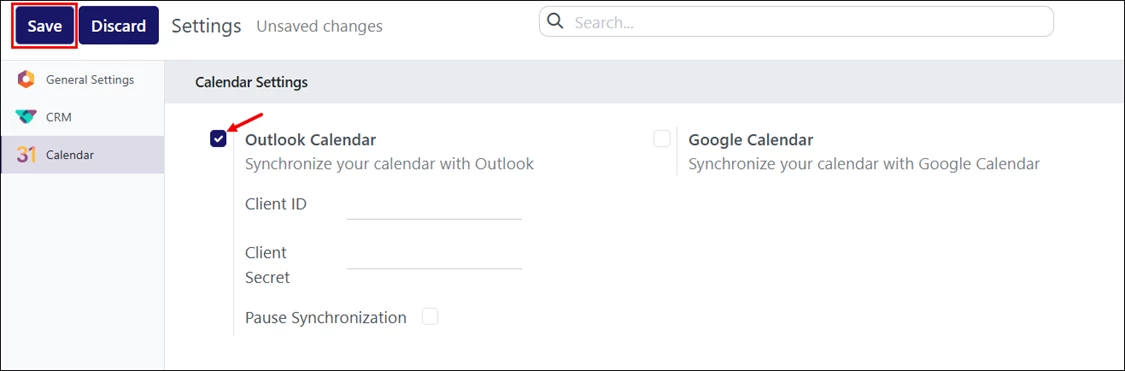
Check the “Outlook Calendar” option, then click “Save.”
In the Microsoft Azure portal, under the Overview section of the registered application:
- Copy the Application (Client) ID (if it hasn't already been copied).
- Paste it into the Client ID field in LeadFlow.
Then:
- Copy the previously saved Client Secret Value.
- Paste it into the “Client Secret” field in LeadFlow.
Click “Save” at the top.
Sync with Outlook
Important Steps Before Synchronizing
We strongly recommend testing Outlook Calendar synchronization using a test email address before syncing a production calendar.
If events already exist in the LeadFlow Calendar before the first sync, Outlook may treat imported events as new and send notifications to all attendees.
To avoid unwanted notifications during the first synchronization:
- Add the existing LeadFlow events to Outlook before the first sync.
- Delete those events from LeadFlow.
- Start synchronization.
Even after synchronization is complete, Outlook may continue sending notifications whenever events are edited, deleted, restored, or rescheduled. Outlook controls this behavior, and it cannot be changed from LeadFlow.
Summary
After synchronizing your Outlook Calendar with the LeadFlow Calendar:
- Creating an event in LeadFlow sends an invitation to attendees in Outlook.
- Deleting an event in LeadFlow sends a cancellation.
- Unarchiving an event sends an invitation.
- Archiving an event sends a cancellation.
- Adding a contact to an event may send an invitation.
- Removing a contact from an event may send a cancellation.
LeadFlow may trigger Outlook notifications to all event participants when calendar events are created, updated, approved, rejected, archived, or canceled. Notification behavior depends on the action performed in Outlook and whether attendees have accepted or rejected the invitation.
Sync LeadFlow Calendar and Outlook
Please note that the user initiating the synchronization must use the same email address in LeadFlow as the Outlook mailbox being connected.
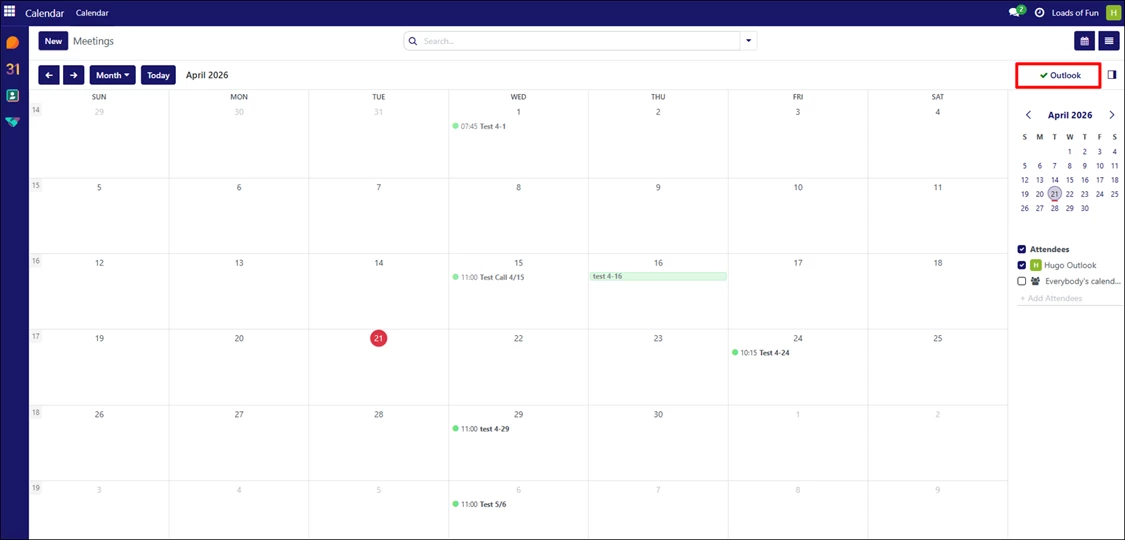
In the LeadFlow site, open the Calendar screen, and click the Outlook sync button on the right side of the page.
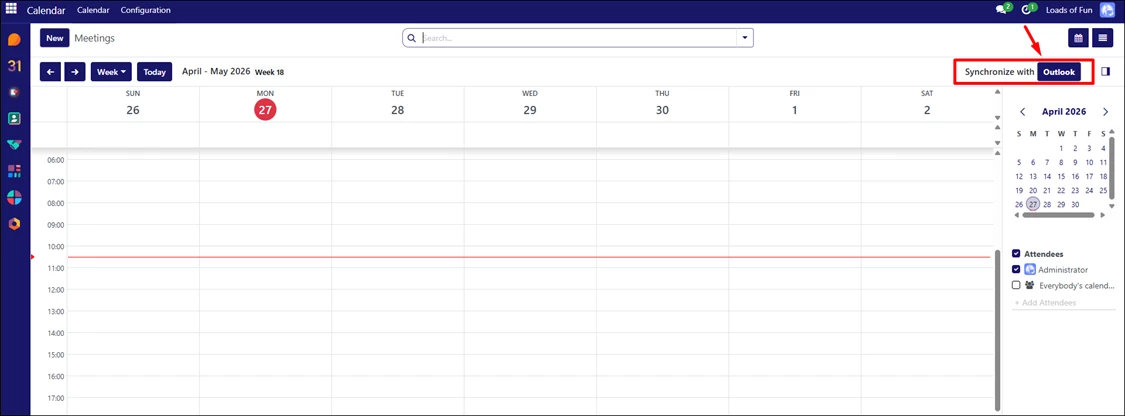
Synchronization is a two-way process, meaning that events are reconciled in both accounts (Outlook and LeadFlow).
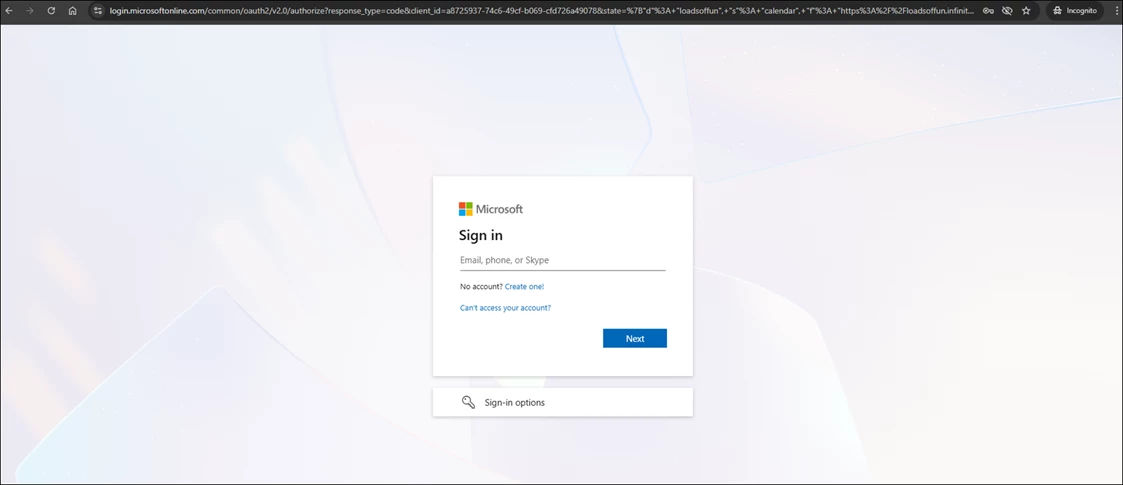
You will be redirected to a Microsoft login page. If you are not already signed in, log in to your Microsoft account.
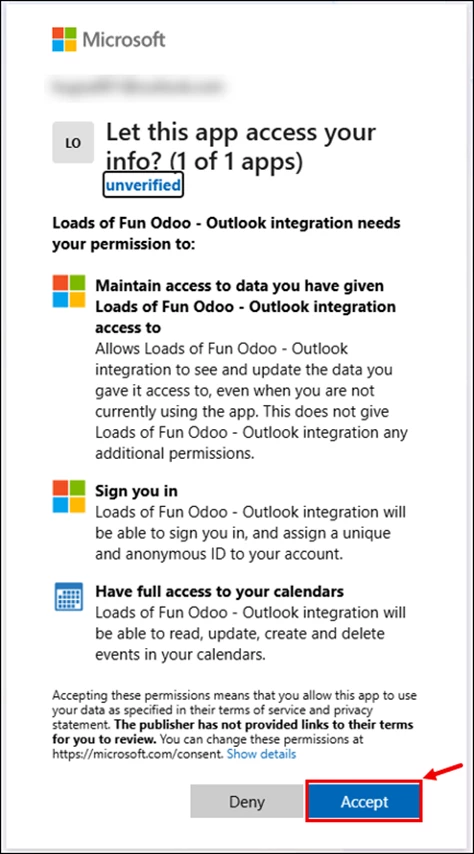
Grant the required permissions by clicking “Accept.”
Once permission is granted, the LeadFlow calendar will show events from both Outlook and LeadFlow. The Outlook button in the top-right corner of the screen will display a green check mark when it’s synchronized.
The first synchronization may take some time depending on calendar size, number of events, participants, and total data volume.
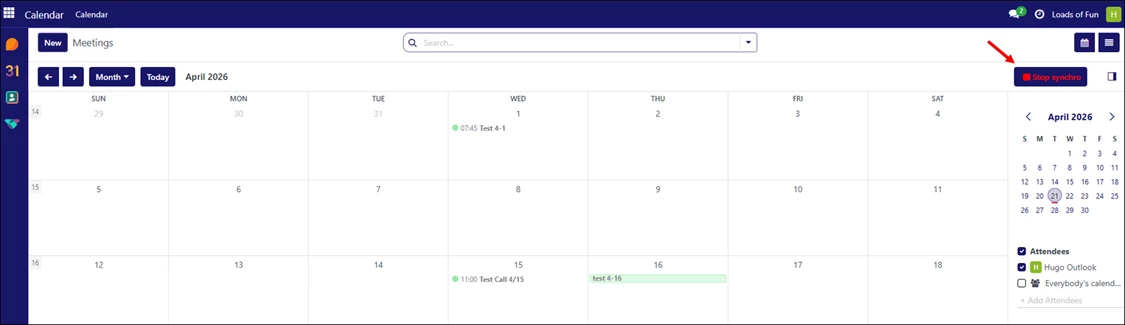
To stop synchronization, hover over the Outlook button and click “Stop synchro.”
Troubleshoot Sync Issues
The first synchronization after setup may take some time. If the Outlook Calendar does not sync correctly with LeadFlow, review the database logs for errors. If needed, follow the steps below to reset the calendar account and resynchronize.
Reset the Calendar Account
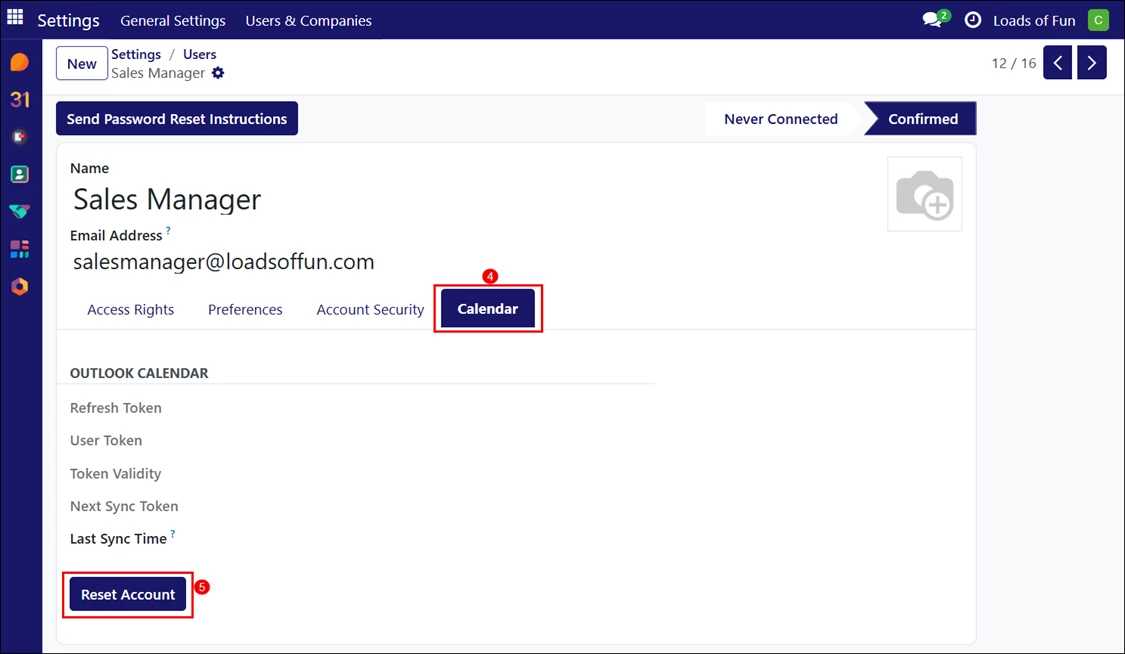
In LinenFinder LeadFlow:
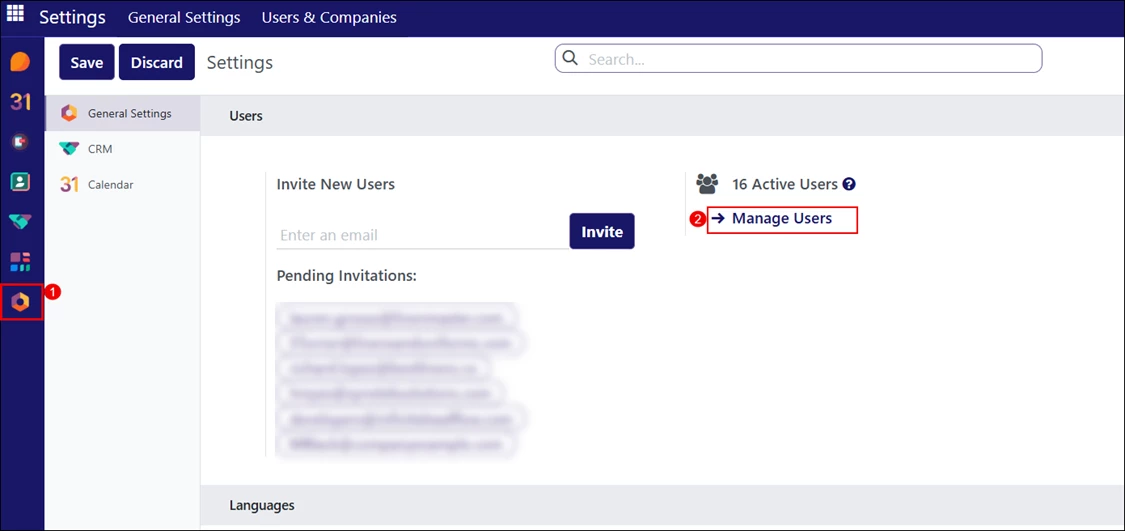
- Go to Settings.
- Click “Manage Users.”
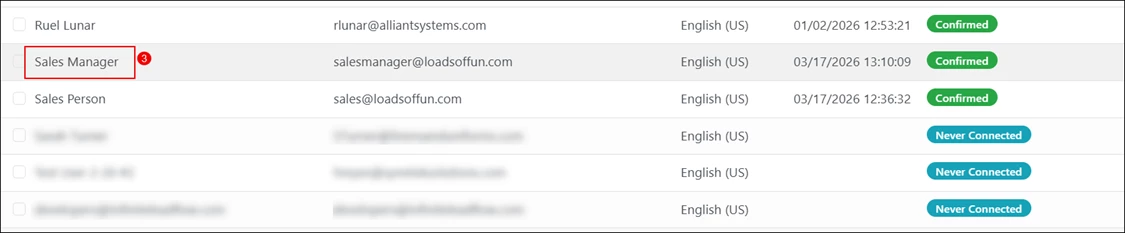
- Select the affected user.
- Open the Calendar tab.
- Click “Reset Account.”
Reset Options
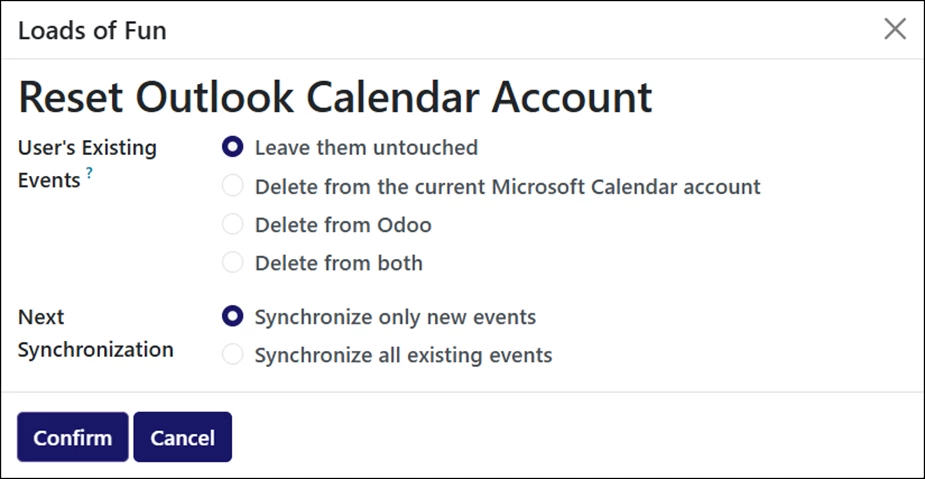
The “Reset Account” button will open a pop-up window to choose how existing events should be handled when resetting the Outlook Calendar:
User’s Existing Events:
- Leave them untouched: no changes to the events.
- Delete from the current Microsoft Calendar account: delete the events from Microsoft Outlook Calendar.
- Delete from LeadFlow: delete the events from the LeadFlow Calendar.
- Delete from both: delete the events from both Microsoft Outlook Calendar and LeadFlow Calendar.
Next Synchronization:
- Synchronize only new events: syncs only newly created events.
- Synchronize all existing events: reprocesses all existing events in both Outlook and LeadFlow.
- Check this option if events do not appear in the calendar after several hours.
Click “Confirm” after making the selection to modify the user’s events and the calendar synchronization.